However, if different channels are created on a server, other members on the server can gain access to them. To manage access rights to a channel, you can lock it by either making it private or restricting certain actions such as sending messages. Here’s how to use either method.
Locking a Channel by Making it Private
Making a Discord channel private becomes hidden from other members on a server. Access to these channels will depend on server roles or admin invites. Here are the steps to follow to make a channel private. Step 1: Launch the Discord app.
To make a Discord channel private, you must either be a server administrator or have the right permissions. Step 2: By the left of your Discord app, you should see a list of servers you have access to. Click on the server hosting the channel that you need to hide.
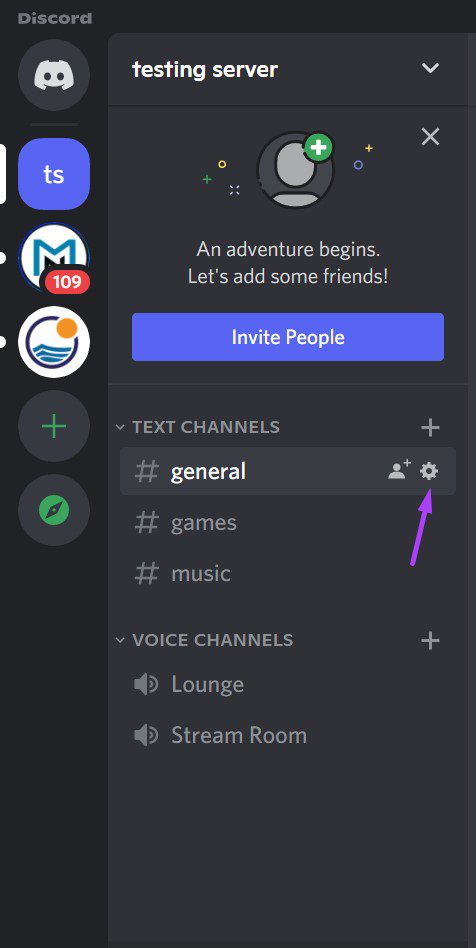
Step 3: Once the Discord server opens, you should see the different text and voice channels available. To hide the channel name, click on the Edit Channel represented by a gear icon.
To find the gear icon for a channel, you must hover your cursor over the channel name. Step 4: On the new window, click on Permissions.
Step 5: Click on the toggle beside Private Channel till a green fill shows. A green fill signifies that the private option has been enabled.
Once you enable the Private Channel toggle, only previously added channel users can see it. Also, every user that has a Server Owner or Administrator role on the server can see and make use of the channel. Step 6: To grant certain individuals access to the Private Channel, click on the Add members or roles button.
Step 7: After adding members or roles, click on Done.
Step 8: Click on Advanced permissions.
Step 9: Under Roles/Members, you will see the roles or members. Click on a role or member and under General Channel Permissions, click the x button beside View Channel to remove their access.
Step 10: Once you choose permissions, click on Save Changes which shows up as a pop-up on the page.
The process for making a channel private on Android or iPhone is similar to the one described above.
Locking a Channel by Disabling Comments
You can also disable comments instead of completely blocking the view for a particular channel. This option might be preferred if you need to create a channel for sending out announcements or rules. By disabling comments, you make the channel a Read-only channel. Here’s what you should do to disable comments only for a channel: Step 1: At the top of the window, click on the drop-down arrow beside the server’s name.
Step 2: Click on Server Settings.
Step 3: Click on Create Role to assign roles to server members.
Step 4: Go to the bottom of the window and click on Save.
Step 5: Navigate back to the server main page and click on the Gear icon beside the channel name.
Step 6: Click on Permissions and Advanced Permissions.
Step 7: Under Roles/Members, you should see the roles or members you created. Click on a role or member.
Step 8: Scroll down to Text Channel Permissions.
Step 9: Next to the Send Messages field, click the x button to prevent members from sending messages to the channel. To grant a particular member access, click their name and click the checkmark to ensure they can send messages.
Step 10: Go to the bottom of the window and click Save to apply your changes.
Appearing Offline on Discord
Now you know how to lock a Discord channel. Both methods discussed above work the same way on all devices. There is a high possibility that if you suddenly make previously public channels, private, server members might send you messages. Another alternative is you make your Discord profile appear offline. The above article may contain affiliate links which help support Guiding Tech. However, it does not affect our editorial integrity. The content remains unbiased and authentic.


